Customizing your Pelican Static Site
Posted on Tue 28 January 2020 in Web_Development
This is the second article in the series "Creating a Personal Static Website with Pelican". This article covers modifying your site design.
- Setting Up Pelican Site Generator
- Customizing your Site <-- this article
- Hosting your Static Site on AWS S3 Buckets
- Creating your Pelican CD Pipeline using Travis
- Buying a Domain name and Pointing the Domain to your Bucket

Pelican allows you to customize your website design by creating your preferred theme or using any of the themes created by the pelican community which can be found here.
The themes should be cloned into your project folder and installed. To keep your project organized, It is advisable to store the themes in a separate directory.
Pelican themes are managed using the pelican-themes command-line tool. This is used to add, remove and list themes.
pelican-theme -i themeFolder# installs the theme the drawback to using this method is that theme must be removed and reinstalled on edit.pelican-themes -r themeName# Removes an installed Theme-
pelican-themes -l -v#list the installed themes. -
pelican-themes --symlink themeFolder# This creates a symlink to the theme folder, changes you make on the themes are immediately propagated without having to reinstall the theme.
Although the Pelican-theme command manages the themes for the pelican engine, the User has to specify which theme is to be used for the site in the Pelican site configuration. This is done by setting the Theme variable to the desired theme.
vi pelicanconf.py
...
THEME = "themename".
Or
pelican content -t pathtotheme
Each theme also comes with some extra set of configuration variables to set certain behaviors, check the theme readme for more information. For the Flex Configuration visit here
Installing the Flex Theme.
For my website, I choose the Flex theme due to the simplicity of its design. the link can be found here.
Create a new directory called themes and clone your desired theme to this directory.
mkdir themes && cd themes
git clone https://github.com/alexandrevicenzi/Flex.git
Install the Flex Theme
Pelican-theme -i themes/Flex
Set the Website theme in Site Configuration
vi pelicanconf.py
...
THEME = "themename"
On regenerating the HTML pages, the site appears with the new theme.
make devserver
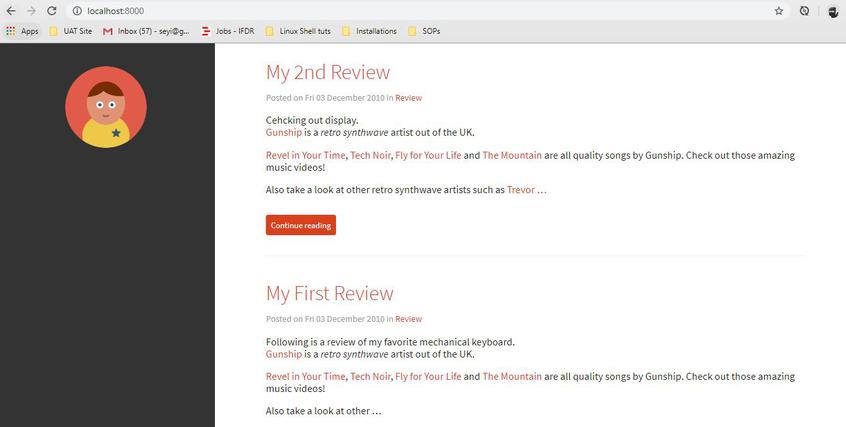
pelican Flex theme
Theme Template Structure
.
├── static
│   ├── stylesheet/
│   ├── font-awesome/
│   ├── pygments/
│   └── images/
└── templates
    ├── archives.html         // to display archives
    ├── article.html          // processed for each article
    ├── categories.html       // must list all the categories
    ├── category.html         // processed for each category
    ├── index.html            // list of all articles available
    ├── page.html             // pages such as about me, that are different from articles
    ├── tag.html              // display for each tag
    ├── tags.html             // must list all the tags. Can be a tag cloud.
    └── partial/              // code snippets to be imported into templates
        ├── cc_license.html
        ├── copyright.html
        └── disqus.html
staticcontains all the static files which are to be copied to the generated output folder. All static assets can be included in this folder e.g. documents.templatescontains all the templates that will be used to generate the content. The template files listed above are mandatory; you can add your templates if it helps you keep things organized while creating your theme.
Editing a template.
One of the advantages of using pelican is the ease of customization, Pelican uses the Jinja templating engine due to its flexibility and straightforward syntax, making themes easily customized to suit your design preferences.
An example is changing the default social media share to a darker themed share for the article template. here I took advantage of the jinja templating engine by creating the new feature as a partial template and only load when the variable assigned for using my dark themed share is called
Creating the HTML template
First, create the template in partial/ directory inside my template directory. The share theme template contains the HTML code for creating the dark share theme
vi themes/Flex/template/partial/darkshare.html

<div class="sharepage">
  {% set art_url = SITEURL + '/' + article.url %}
  <!-- share test -->
  <span style="color: silver;">
    Share on:
  </span>
  <div id="share-buttons">
    <div class="facebook" title="Share this on Facebook">
      <a href="http://www.facebook.com/share.php?u={{ art_url|url_encode }}" target="_blank">
        <svg viewBox="0 0 1792 1792" xmlns="http://www.w3.org/2000/svg"><path d="M1343 12v264h-157q-86 0-116 36t-30 108v189h293l-39 296h-254v759h-306v-759h-255v-296h255v-218q0-186 104-288.5t277-102.5q147 0 228 12z"/></svg>
      </a>
    </div>
    ...
</div>
The div tag contains an SVG images logo for each social media platform which acts as the link to share the articles to the platform. The Link for each article is inserted dynamically using the jinja templating language. Click here for more info on Jinja Template.
-
{% set art_url = SITEURL + '/' + article.url %}this is used to set the absolute article URL by appending the site URL and article URL. this is done to call the absolute path when needed than always adding when needed -
{{ art_url|urlencode }}used to pass the jinja filter urlencode on the url defined earlier. filters act as functions to carry out actions on the value passed to them. this was passed as the Facebook share link uses the encoded url of the article it is sharing.
Linking the template.
Templates can be loaded in other templates using jinja include method this allows templates to be better structured and reusable.
The darkshare template will be attached at the bottom of every article, so we find the article template and include the darkshare template at the bottom. Also note, we would also allow the user to turn off this feature by attaching a variable in the pelicanconf.
vi themes/Flex/template/article.html

{% if SOCIAL_SHARE %}
  {% include "partial/sharepage.html" %}
{% endif %}
SOCIAL_SHARE is the variable used for managing the darkshare template. if the variable is set to false or not declared, the template is not imported into the article page.
Set the Social Share Variable
vi pelicanconf.py
SOCIAL_SHARE= True
Styling your Template with CSS
custom css can be added to templates by defining the css file path in the STATIC_PATHS variable
STATIC_PATHS = ['images', 'static']
The Flex theme has its variable for locating the custom CSS
CUSTOM_CSS = 'static/custom.css'
Create your CSS file
vi content/static/custom.css

#share-buttons > div {
    position: relative;
    text-align: left;
    height: 36px;
    width: 32px;
    float: left;
    text-align: center;
}
#share-buttons > div > svg {height: 16px; fill: #d5d5d5; margin-top: 10px;}
#share-buttons > div.facebook:hover > svg {fill: #3B5998;}
...
.sharepage { background-color: #242121;}
Other Flex Modification on my website.
- Article Pagination: To Display Links and Title to the previous and next article at the bottom of the page. uses the
LINK_PAGINATIONvariable - Side Category Menu: Displays All Categories on the sidebar. enable using the
SIDE_CATEGORYvariable - Recent Articles: Displays Most Recent Articles on Side Bar, Set RECENT_ARTICLE_COUNT Variable to Specify Number of Articles to display as recent, Defaults to 5 if not Set.
RECENT_PAGES - Tag Cloud: Displays Most used tags using the Font size. Set using
SIDE_TAG_CLOUDVariable - Hamburger Menu for Mobile View
- Back to Top Button
Plugins
Also another way to add external features to pelican. This website uses the advthumbnailer plugin for resizing images
Installing the advthumbnailer plugin
pip install pelican-advthumbnailer
Add the plugin to the pelican config variable PLUGIN = [advthumbnailer, otherplugins]
Plugin Use
<img src="images/thumbnails/<spec>/example.png" /> #the thumbnails/<spec> is used by the plugin
Where spec is the scaling size e.g 200x300, or 200x to get a square resize
e.g to display resize an image in images/test.png to 100x100.
<img src="images/test.png" />
to
<img src="images/thumbnails/100x/test.png" />
After Customizing your site to your desired taste, Regenerate your Website, Review and Merge with the master branch.
make html
pelican --listen
Livereload Library
One of the tools I use to enhance my productivity is the livereload Library and Browser Plugin. The Livereload Plugin refreshes your browser page when a file change is detected, while the Server watches specified files for change.
This is used in addition to the pelican command wrapper which watch for changes and recompiles your pages, However, the pelican commands by default do not watch changes made to the Theme folder, only applying theme changes when the content or pelican configuration is edited.
Another advantage of using the Livereload Plugin is the removal of the repetitive process of refreshing your page every time the HTML pages are regenerated.
Using livereload Library is fairly easy.
Install the Livereload Lib
pip install python-livereload
Create your livereload script
vi reloader.py

from livereload import Server, shell
from pelican import Pelican
from pelican.settings import read_settings

p = Pelican(read_settings('pelicanconf.py')) #reads the pelicanconf file using the read_setting function in pelican settings file

def compile():
    try:
        p.run() #regenerates the HTML Pages
    except SystemExit as e:
        Pass  #ignores system errors during page regeneration

server = Server()
server.watch('content/', compile) #add directories or files to watch for changes
server.watch('themes/', compile)
server.watch('./pelicanconf.py', compile)
server.serve(root='output', port=8000) #folder to be served and port
Go to your preferred browser and install the Livereload Plugin.
After installing the Add-on. Run your Livereload script
python reloader.py
You can now access your Site at localhost:8000 and view your changes as you make them.
The Next Article on Hosting Your Static Site on AWS S3 can be found Here